
How to setup Set Static IP / DHCP IP (Chroma Rackmount Encoder/Decoder)
Static IP
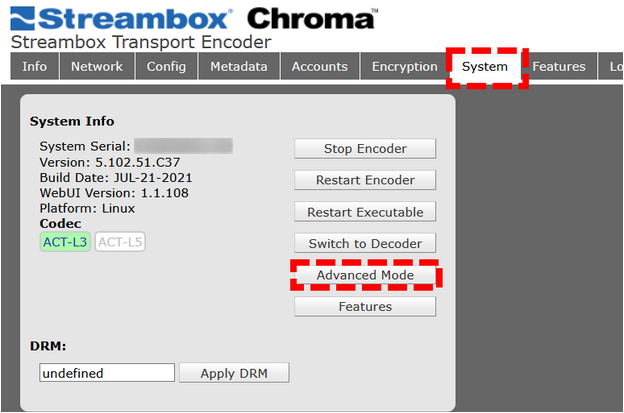
Go to the WEB UI -> Systems Tab -> Advance mode -> Network -> Lan 1 or Lan 2 from there you can see a DHCP option or Static IP option.
Begin by logging in to Chroma HD using a web browser (use default credentials)
Go to the System Tab, and click the Advanced Mode button:
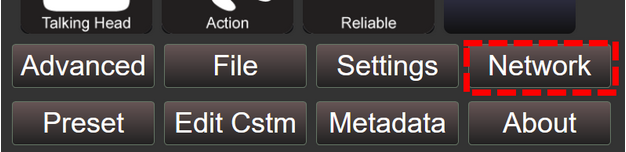
In the Advanced Mode, select Network to go to Network Settings:
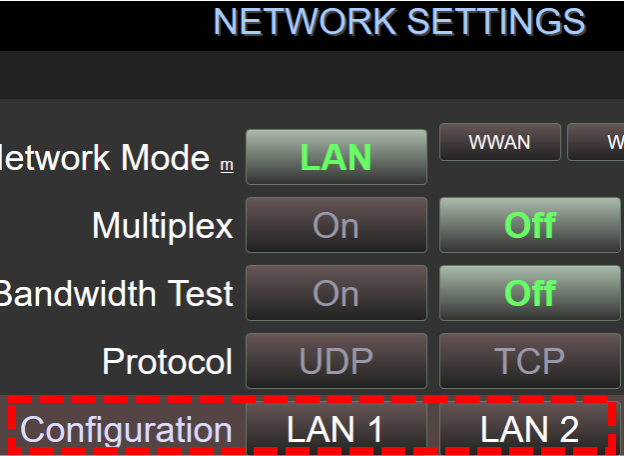
And select LAN1 or LAN2 on the Configuration line to enter IP settings for each Network Port
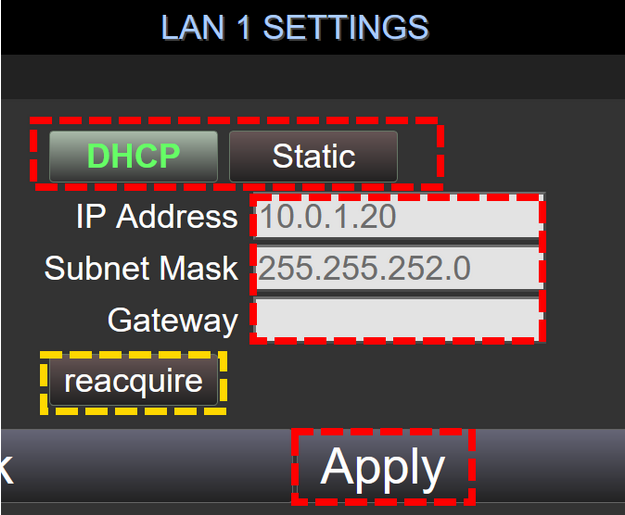
Here is the config page for LAN1. Select DHCP mode or Static Mode, depending on whether you are using a DHCP server to assign the IP address, or whether you will manually input a static IP address, Subnet Mask, and Gateway.
The "Reacquire" button will re-requested address information from the DHCP server. Select your mode, enter the IP info if you are using Static, and click Apply.
Repeat the procedure for LAN2, which appears the same as below if needed.
DHCP IP
In case you can’t get access to the Web UI and switch back to DHCP mode, please check your LAN cables or firewall (if your IT people configure the firewall to allow limited outgoing connections, it's possible the IP you changed it to was not set for the necessary outgoing connections.
The only way to access it at this state is to connect an ethernet cable directly between the Chroma and another computer (laptop or what have you). In order for the two machines to see each other, get the local static IP of your device using the LCD display: select IP status from the main menu to view it. Set the Ethernet IP address of the computer you've connected as the same IP Address except for the last octet (the last of the 4 numbers of the IP) should be slightly different.
Using the example from the attached picture:
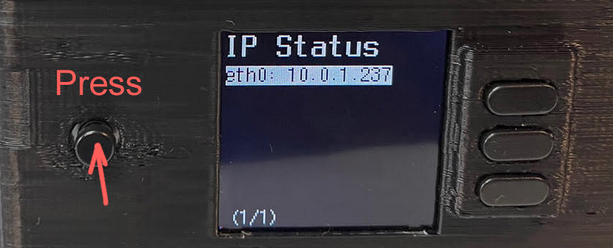
Chroma X: 10.0.1.237
therefore, set the laptop (or whatever computer) IP to 10.0.1.238
(The highest number allowed is 255, so if the Chroma already ends in .255, use .254 instead.)
On the computer, set the subnet mask to 255.255.255.0
DNS Settings
You can set the DNS in Chroma by connecting via SSH.
If you find that your server’s Domain Name Server (DNS) settings are misconfigured or you prefer to use your own, this manual describes how to change your Linux server’s DNS settings.
Add name servers to the configuration file
On most Linux operating systems, the DNS servers that the system uses for name resolution are defined in the /etc/resolv.conf file. That file should contain at least one nameserver line. Each nameserver line defines a DNS server. The name servers are prioritized in the order the system finds them in the file. Use the Internet Protocol (IP) addresses of the name servers when you enter them into the configuration file because the system doesn’t know what to do with domain names until after it knows how to get to the DNS servers.
In some cases, /etc/resolv.conf could be a directly managed file, populated by the network service (network by using initscripts or NetworkManager). To directly edit the configuration file, use the following steps to add the DNS servers:
Open the resolv.conf file with an editor, such as nano, to make the necessary changes. If the file doesn’t already exist, this command creates it:
sudo nano /etc/resolv.conf
Add lines for the name servers that you want to use:
nameserver 8.8.8.8
nameserver 4.4.4.4
Save the file.
To ensure that your new settings are working, ping the domain name by using the following command:
ping -c 3 google.com
If you receive an unknown host message, double-check the IP addresses that you set as your DNS servers.